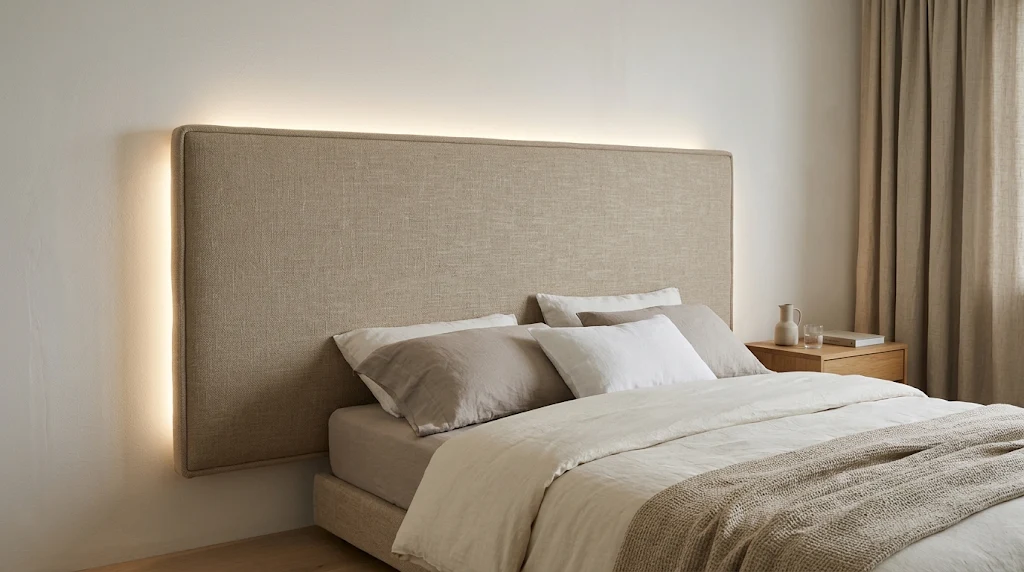
The floating headboard is a popular bedroom feature for good reason: it reads cleanly, and the concealed supports make the panel appear to hover. Behind that clean image sits a chain of dependencies. A soft padded face can swallow the light from the rear strips. Fabric left slightly loose throws shadows across the wall. And once the panel is closed and sealed, accessing any of it later becomes a chore.
Working through the details before anything is cut is the most efficient path. The covering, the frame, and the light arrangement need to be considered as one system, and that is especially true when an older headboard is being adapted rather than built from new.
Anyone reviewing headboard upholstery services will find plenty of discussion about colours and weaves. The more useful conversation covers construction. How are the edges turned? Which route will the cables follow? Does the whole panel come away from the wall when access is needed?
Measure the separation carefully
What makes the panel appear to float is the gap it holds against the wall. Strips fixed at the rear light into that space, and the outline they cast becomes the visible effect. The supports themselves disappear from normal sightlines.
There is no universal clearance figure. It depends on where the strip sits, how bright it runs, how thick the finished panel becomes, and how the wall accepts light. A tight gap outlines the board sharply. A wider one lets the glow drift before it settles.
Allow for the upholstered thickness when sizing this void. Cloth, foam, wadding, and the fabric folded at the corners all add to the finished depth. Planning headboard reupholstery around the bare timber alone usually leaves the strips short of space.
A temporary trial is worth the effort. Mount a short length of the intended strip behind a sample edge and stand at the doorway, then beside the bed, then lying against the pillow. From each of those positions, the hardware should stay hidden.
Test the cloth under the working light
Material selected on a showroom table rarely looks identical once the backlight is live. Shortlisted swatches belong in the actual bedroom, held against the actual wall colour, lit by the intended LED temperature. That single step prevents most disappointments.
Texture shifts the reading dramatically. Velvet’s pile turns lighter or darker with the viewing angle. Bouclé presents an irregular surface, more pronounced where it wraps a corner. A flat, closely woven cloth produces the sharpest outline, but it also reveals any unevenness in the padding beneath.
None of these options is inherently wrong. The decision turns on whether the room wants a defined silhouette or a softer, more tactile border.
When the panel is conventionally padded, the glow should wash the wall rather than pass through the covering. Pale or loosely woven fabrics can transmit light along thinly padded edges and seams — a detail attentive headboard upholstery services check before production begins. Where a lining becomes necessary, it should block that leak without crowding the strips or closing off their airflow.
Daily wear also shapes the choice. Hair products, skin oils, and constant contact against the backrest will mark the cloth regardless of how thoughtfully the lighting was arranged. Cleaning guidance and suitability for furniture use belong in the conversation.
Control the border around the lit edge
Once the wall behind carries light, the perimeter of the headboard becomes the part people study. Minor differences in foam density or corner geometry show up more readily against a bright field.
A padded centre and a measured edge can coexist. The maker shapes foam and wadding so the front stays comfortable while the returns remain uniform. Nothing about comfort has to be traded for a tidier boundary.
Corners demand enough cloth to fold without crowding. Heavy upholstery materials gather where several layers overlap, altering the distance to the wall — a common wrinkle in headboard reupholstery jobs. Along a curved panel, the fabric must track the arc without wrinkling.
Piping introduces its own trade-off. It finishes the border crisply, yet it also raises a ridge that catches light and throws a thin shadow. Anyone seeking a continuous halo should trial a piped sample before the full panel proceeds.
Channelled or deeply buttoned fronts can also sit alongside backlighting. Keep their depth proportionate, so the surface detail and the luminous edge each hold their own place.
Separate the lighting from the fabricwork
The reverse side of a padded headboard is a busy zone: folded fabric, staples, wadding, and often a dust cover. The lighting hardware needs a clearly marked territory of its own.
An aluminium channel offers a firm base for the strip and accepts a diffuser. The diffuser breaks up individual bright points, though spacing between diodes, viewing distance, and the surrounding finishes all influence the final look.
A sound build reserves a flat, rigid rear area for the lighting assembly and finishes the covering around that zone. Pressing adhesive strips onto cloth or wadding offers no stable foundation and risks shifting over time.
Heat handling must align with the chosen product. Different strips have different thermal needs, so the supplier’s guidance should dictate the mounting method rather than assumption. Channel, strip, and diffuser are best specified as a matched set.
Never wrap diodes in fabric or pad over them with wadding to soften the output. Use components designed for diffusion, and respect the clearances they specify.
Leave a route for wires and future work
This headboard might be recovered a decade from now, and a driver could fail well before that. Both jobs grow difficult when cables and connectors sit buried under permanent covering.
Decide where the driver will live before the face is sealed. It must remain reachable and observe the ventilation its manufacturer requires — a constraint that experienced headboard upholstery services build into the frame design. Closing it inside padded construction is acceptable only when the installation was drawn to meet those conditions, and requirements differ between products.
The cable path should steer clear of staple rows, brackets, and any spot where the panel could trap a wire against the wall. Holes through the backing need finishing so sharp edges cannot cut into the sheath.
A removable rear panel may provide entry, depending on the construction. The real measure of success is whether the components can be reached without cutting cloth or dismantling the piece.
Fixed mains wiring should be handled by a qualified electrician, who can also confirm the wider arrangement is sound.
Assess the old frame before converting it
Fitting new cloth alone will not create the depth these strips need. Headboard reupholstery can, however, be a sensible moment to introduce backlighting — provided the frame underneath can support it.
Begin by examining the structure. Is the backing sound? Are the joints firm? Can the mounting arrangement hold the panel at the intended distance from the wall? A board made to attach to a bed base will likely need different fixings for wall installation.
The finished depth deserves attention as well. Rear supports and lighting push the upholstered face further into the room, which can alter clearances to the mattress, bedside tables, and sockets. Measure those relationships with the bed placed where it will stay.
Request that the structural adaptation and the covering work be priced as separate lines in the quotation. That separation shows whether the proposal covers new fixings, lighting channels, access openings, and frame modifications, or only foam and fabric.
When the original covering comes off, inspect the foam underneath. Worn or lumpy padding will undermine both the comfort of the bed and the evenness of the finished outline.
Settle the intended appearance in advance
Before arranging any work, bring the cloth sample, panel dimensions, wall finish, and proposed lighting layout together. This is the right moment to raise construction questions with headboard upholstery services, ahead of any cutting. A reference photograph conveys the mood, but it cannot reveal the hidden build that produces it.
Clarify which edges will carry light. Illuminating only the top reads differently from running strips along the top and both sides. A low illuminated edge also needs checking against pillows, bedding, and the mattress line.
Check brightness and dimming from the bed itself. A glow that appeals from the doorway may feel too strong at close range in a dark room. Controls should sit within easy reach without moving furniture or reaching behind the panel.
Once installed, review the headboard with the room lights on and off. Watch for visible diodes, uneven shadows, puckered fabric, and cables on show. Confirm the panel is firmly fixed and that the planned access route works. These checks land smoothly where headboard reupholstery and service access were considered together from the start.
A finished floating headboard feels easy through the day and holds a controlled, even outline at night. Reaching that result rests on early decisions: consistent edge work, concealed supports, appropriate lighting hardware, and a workable way in behind the cloth.