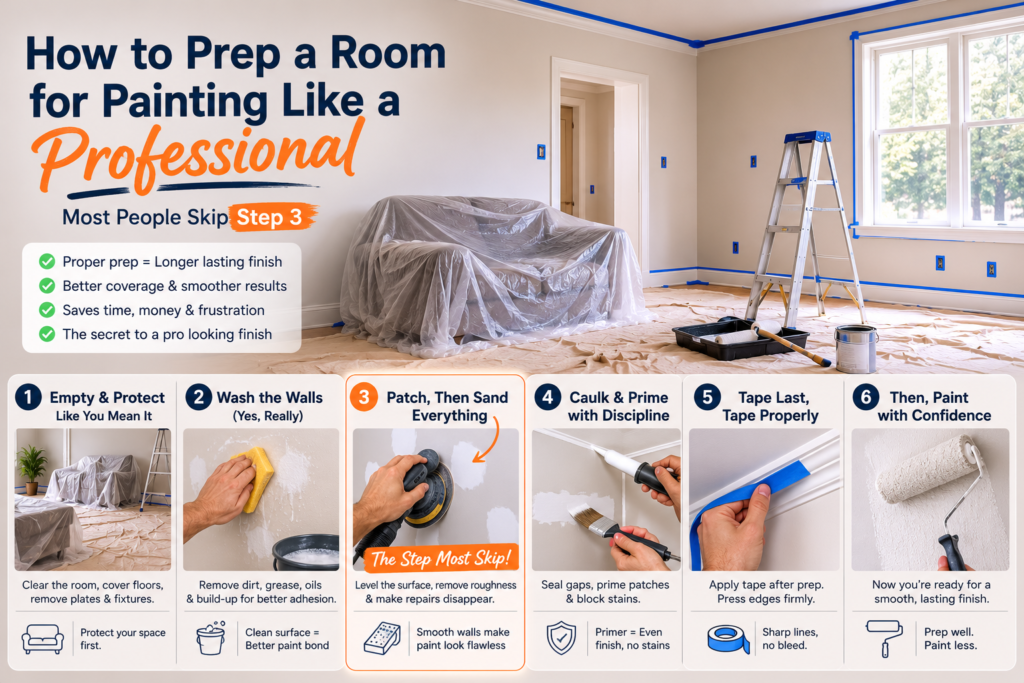
Watch a professional crew paint a living room and you will notice something that surprises most homeowners: for the first several hours, nobody paints anything. The room gets emptied, protected, washed, patched, sanded, caulked, primed, and taped before a single drop of colour appears, and that ratio of preparation to painting is not caution or padding; it is the actual product. Ask any experienced interior painting company what separates a finish that still looks crisp after a decade from one that looks tired in three years, and the answer is always the same: the hours spent before the lid comes off the can. Paint is a thin, honest material. It faithfully reproduces every flaw in the surface beneath it and bonds only as well as that surface allows, which means the quality ceiling of any paint job is set during prep, and the painting itself merely reaches or misses that ceiling.
Here is the full professional sequence in its correct order, including the step most DIY painters skip entirely. That skipped step, as it happens, is the single biggest reason freshly painted walls that looked flawless at noon so often disappoint under raking evening light.
Step 1: Empty and Protect Like You Mean It
Professionals over protect for a simple commercial reason: one drip on a sofa erases the profit of the entire day, and the same math applies to your own belongings. Take everything off the walls, move furniture to the centre of the room or out of it entirely, and cover the floors with canvas drop cloths rather than plastic sheeting, because plastic gets dangerously slippery underfoot and tears at the worst moments, while canvas absorbs drips and stays put. Remove every outlet cover, switch plate, vent cover, and piece of hardware instead of taping around them; the removal takes two minutes per room, produces perfectly clean edges, and is one of the most visible differences between amateur and professional results. Bag light fixtures and ceiling fans, and tape the bags shut. When the room looks like nobody could possibly make a mess in it, stage one is complete, and everything that follows goes faster because nothing needs to be worked around.
Step 2: Wash the Walls (Yes, Really)
Every lived in wall carries an invisible film: airborne dust, cooking aerosols, hand oils around switches and doorframes, candle and fireplace soot, and in some homes nicotine. Paint applied over that film does not bond to the wall; it bonds to the grime, and the grime’s grip on the wall becomes the weakest link in the whole system, surfacing later as poor adhesion, fisheyes, or peeling. The fix is almost embarrassingly cheap: a bucket of warm water with a small amount of degreasing cleaner, a sponge, and roughly twenty minutes per room, working top to bottom. Kitchens, bathrooms, hallways, and the zones around light switches need the most attention, and glossy surfaces benefit from the wash doubly because it also removes the residues that sanding would otherwise drag around. Rinse with clean water, and let everything dry fully before the next stage, because the next stage generates dust and dust sticks to damp walls.
Step 3: Patch, Then Sand Everything (The Skipped Step)
Everyone fills the big holes; that part of prep survives even in rushed jobs. What almost nobody does, and what professionals never skip, is sanding the entire wall surface after patching, and this is the step that decides how the room looks under low, raking light. A pass over every wall with fine sandpaper on a pole sander accomplishes three things at once: it levels the patched spots dead flush so they vanish instead of sitting proud, it knocks down the accumulated texture of previous roller stipple, drips, and micro debris trapped in old coats, and it scuffs any glossy areas so the new paint can grip them mechanically. The result is a uniformly smooth, uniformly dull surface, and uniformity is precisely what evening light reveals or punishes: walls sanded this way glow evenly, while unsanded walls telegraph every old repair and every previous painter’s technique through the fresh colour. Wipe or vacuum the sanding dust off afterward, always, because paint applied over dust is paint waiting for a reason to peel.
Step 4: Caulk and Prime With Discipline
Two smaller tasks close out the surface work, and both punch far above their weight. First, run a fine bead of paintable caulk along the gaps where trim meets wall and where trim meets trim, smoothing it with a damp finger; those unbroken lines between wall colour and trim colour are half of what the eye reads as a professional job. Second, spot prime every patch, every stain, and every area of bare surface with the appropriate primer. Primer does a job topcoat cannot: it seals repairs so they absorb paint at the same rate as the aged wall around them, preventing the dull ghost patches called flashing that otherwise appear at every repair site. Water stains, marker, and smoke damage need a dedicated stain blocking primer, because they will bleed through any number of coats of ordinary paint. The major manufacturers publish surface preparation guidance that mirrors this exact sequence, and reading it before a big project is time well spent (sherwin-williams.com).
Step 5: Tape Last, Tape Properly
Tape goes on last, after washing and sanding, so it adheres to clean, dust free surfaces rather than lifting mid job. Apply it along ceilings, trim, and around fixtures, and press the sealing edge down firmly with a putty knife or a fingernail, because bleed under happens at edges that were laid on rather than pressed on. At the other end of the job, pull the tape when the final coat is dry to the touch but not fully cured, drawing it back at a low angle against itself for the crispest possible line; fully cured paint can tear along the tape line instead of releasing cleanly.
The Payoff, and the Honest Alternative
Done in this order, preparation typically takes as long as the painting itself and sometimes longer, which is exactly the proportion you see on professional job sites. It is also the reason a properly prepped room looks better in year five than a rushed one looks in month one: the surface was true, the bond was real, and the film thickness was even, so nothing has anywhere to fail from. If the full sequence multiplied across a whole house sounds like more weekends than you own, that is a legitimate conclusion rather than a defeat, because prep labour is precisely what you are buying when you hire a professional interior painter: not someone who applies paint faster, but someone who builds the surface that makes the paint worth applying.
Frequently Asked Questions
Do I really need to wash walls before painting?
In almost every room, yes. Household film of dust, cooking residue, and skin oils prevents proper adhesion and can cause fisheyes, poor coverage, and eventual peeling. Kitchens and bathrooms are the worst offenders, but even bedroom walls carry enough invisible residue to matter, and the wash costs twenty minutes per room.
What grit sandpaper should I use on walls before painting?
Fine grit, in the 120 to 220 range, on a pole sander for the walls themselves. The goal is not removing material but leveling patches, knocking down old roller texture, and dulling sheen so the new coat grips. Always remove the sanding dust afterward with a vacuum or damp wipe, since paint over dust adheres to the dust rather than the wall.
Can I skip primer if my paint says paint and primer in one?
Self priming paints perform reasonably on clean, previously painted walls in a similar colour, which is the situation they were designed for. They do not replace dedicated primer over patches, stains, bare drywall, or glossy surfaces, and spot priming repairs is what makes those repairs invisible in the finished job rather than dull ghost patches.
How long does proper prep take for an average room?
For a typical bedroom in decent condition, plan on three to five hours including drying time after washing, and more for rooms with extensive repairs, glossy paint, or stains. As a working rule, preparation should take roughly as long as the painting itself; when it takes dramatically less, the finish usually shows it.