Motorcycle suspension changes everything about how a bike feels on the road. A smooth ride is not just comfort. It is control, balance, and confidence. Riders today want more than factory setups. They want control over height, stance, and comfort. That is where modern air systems come in.
Custom builders and daily riders now explore air-based systems for flexibility. These setups adjust ride height with simple controls. They also improve handling on rough roads. When installed right, they feel like the bike is reading the road before you do.
This guide explains the full process in a simple way. It focuses on real steps, clear thinking, and practical installation flow. The goal is to help you understand the system deeply and install it with confidence.
Understanding Air Suspension Systems for Motorcycles
How Air Suspension Changes Ride Feel
Air systems replace fixed springs with air-controlled chambers. This allows quick height changes. Riders can lower the bike when parked or raise it when riding fast. The feel is smooth and adjustable like air itself.
Many riders compare it to switching between two bikes in one frame. That flexibility is what makes modern systems popular in custom builds.
Core Idea Behind Modern Suspension Control
At the center of these systems is air pressure. More air means higher lift. Less air means lower stance. Simple controls manage this balance. It gives riders a direct connection between machine and road.
The system reacts fast, but still feels stable. That balance is important for safety and comfort during rides.
Why Riders Choose Advanced Air Systems
Many riders upgrade for comfort and style. Others want better corner handling or show-bike stance. Systems like Motorcycle Air Suspension Kits allow all these goals in one setup.
These kits are also supported by companies that focus on performance air systems, compressors, and onboard air solutions. That ecosystem makes upgrades easier for enthusiasts.
Basic Components You Must Know First
Before installation, you must understand the main parts. There are air struts, compressors, tanks, and control lines. Each part has a role in pressure and movement.
When all parts work together, the system becomes smooth and responsive. Missing one step can affect the full performance.
Safety Mindset Before Installation Begins
Every air system depends on pressure control. That means safety comes first. Always release air before working. Check fittings twice. And ensure electrical wiring is stable.
Think of it like breathing for your bike. If airflow is not controlled, the system cannot behave properly.
Preparing Your Motorcycle for Air Suspension Installation
Choosing the Right Bike Setup
Not all motorcycles start the same. Some need custom brackets. Others need frame adjustments. Sport bikes, cruisers, and touring bikes all have different space layouts.
Before installing Motorcycle Air Suspension Kits, you must confirm compatibility. This avoids fitment stress later.
Workspace Setup for Clean Installation
A clean workspace matters more than most riders think. You need space to lift the bike safely. Good lighting also helps you avoid wiring mistakes.
A stable stand keeps the motorcycle steady during installation. Movement during setup can cause alignment issues later.
Disconnecting Stock Suspension Carefully
Removing factory suspension is the first major step. This must be done slowly. Each bolt should be removed with care to avoid frame stress.
Keep all parts organized. Even if you do not reuse them, they help during reference checks.
Inspecting Frame and Mount Points
After removing stock parts, inspect the frame. Look for cracks, rust, or weak points. Air systems apply different pressure patterns, so the frame must be strong.
This step ensures long-term safety and smooth performance after installation.
Planning Air Line Routing Before Assembly
Air lines are like blood vessels in the system. They must be placed cleanly. Avoid sharp bends or heat zones.
Planning before installation saves time and prevents leaks. It also makes the system more reliable in long rides.
Electrical Preparation for Compressor System
Most air systems need a compressor. That means wiring is part of the job. Check battery health first. Then plan fuse protection and switch placement.
Good wiring ensures fast response and stable pressure control.
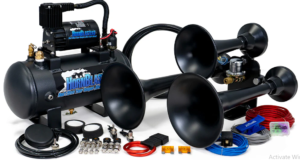
Understanding the Role of Onboard Air Systems
Modern setups often include onboard air tanks and compressors. These systems provide instant pressure changes. They also support other accessories like horns or tire adjustments.
Brands in the performance space, including those focused on onboard air solutions, often design systems for multi-use flexibility.
Step-by-Step Installation of Air Suspension Components
Installing Front Air Struts
Front struts replace the original forks or shock units. Alignment is critical here. The strut must sit straight without tension.
When installing Motorcycle Air Suspension Kits, front balance affects steering. Even a small misalignment can change ride feel.
Mounting Rear Air Suspension Units
Rear units carry most of the bike’s load. Installation requires strong mounting points. Bolts must be tightened evenly.
The rear system controls stance changes. It also affects how the bike reacts during acceleration.
Connecting Air Lines with Care
Air lines must be cut clean and pushed fully into fittings. Loose connections create leaks. Leaks reduce performance and stability.
Take time with each connection. It is better to go slow than fix errors later.
Installing Compressor and Air Tank Setup
The compressor is the heart of the system. It fills the tank and controls pressure flow. It must be mounted in a ventilated area.
The tank stores air for quick use. This ensures smooth ride adjustments even when the bike is off.
Wiring Control Switches and Electronics
Control switches allow riders to adjust height instantly. These must be placed in easy reach positions.
Wiring should stay away from heat and moving parts. Clean wiring gives stable and fast response.
Testing Air Flow Before Final Assembly
Before tightening everything, test airflow. Inflate and deflate the system slowly. Listen for leaks.
This step confirms if the system is sealed. It also checks if response time is correct.
Adjusting Ride Height Calibration
Every bike has a natural balance point. You must set default ride height carefully. Too low affects stability. Too high affects control.
Motorcycle Air Suspension Kits allow precise tuning, so take time to find the perfect middle ground.
Fine-Tuning Performance and Ride Comfort
Balancing Front and Rear Pressure
Balance is key in air systems. Front and rear must work together. If one side is higher, handling becomes uneven.
Riders often adjust pressure after test rides. Small changes make a big difference in comfort.
Testing Real Road Conditions
Garage testing is not enough. Real roads show real performance. Ride slowly first. Then increase speed gradually.
Feel how the bike reacts to bumps, turns, and stops. This feedback helps refine setup.
Adjusting for Custom Bike Builds
Custom bikes often have unique weight balance. That means standard settings may not work.
Fine tuning ensures your Motorcycle Air Suspension Kits match your build style. This is where personalization matters most.
Handling Load Changes and Passenger Weight
Air systems adjust easily for extra load. Add pressure when carrying a passenger or luggage.
This keeps the bike stable. It also prevents bottoming out on rough roads.
Monitoring Compressor Performance Over Time
The compressor should not run constantly. If it does, there may be leaks. Listen for unusual sounds.
Good maintenance ensures long system life and consistent ride quality.
Long-Term Care for Air Suspension Systems
Regular checks are important. Inspect lines, fittings, and wiring every few weeks.
Dust and heat can affect performance. Clean installation ensures longer durability.
Improving Ride Style and Visual Stance
Air systems are not only functional. They also change the look of the bike. Lower stance gives a custom style.
Many riders enjoy switching between show mode and ride mode instantly.
Troubleshooting Common Installation Issues
Detecting Air Leaks Early
Leaks are the most common issue. You can detect them by listening or using soapy water.
Fixing leaks early protects the full system. Even small leaks affect pressure stability.
Fixing Slow Response in Height Adjustment
If the bike reacts slowly, check compressor flow and line blockages. Dirty fittings can reduce speed.
Clean airflow ensures fast adjustment and smooth control.
Handling Electrical Connection Problems
Loose wiring can stop the compressor from working. Always check grounding points first.
Stable electrical flow keeps the system responsive and safe.
Solving Uneven Ride Height Issues
Uneven height usually comes from pressure imbalance. Recalibrate both sides carefully.
This step restores balance and improves handling instantly.
Preventing Overload on Suspension System
Do not exceed recommended pressure levels. Too much air can damage seals.
Follow safe limits for long-lasting performance.
Final Thoughts on Building a Reliable Air Suspension Setup
Building Confidence Through Proper Installation
Installing air systems takes patience. Each step builds system strength. Rushing leads to mistakes.
With the right process, your bike becomes more responsive and comfortable.
Why Precision Matters in Custom Builds
Custom bikes reflect personal style. Precision ensures that style also performs well on the road.
A well-installed system feels natural and stable at every speed.
Long-Term Value of Air Suspension Upgrades
Upgrading to Motorcycle Air Suspension Kits is not just about looks. It is about control, comfort, and adaptability.